Heute habe ich ein Tutorial für diesen Artist Trading Block auf dem
Viva Las VegaStamps! Blog für Euch. Den Würfel für den ATB habe ich mit der Silhouette Cameo geschnitten. Natürlich braucht Ihr dafür keine Schneidemaschine. Im Netz gibt es kostenlose Vorlagen dafür oder Ihr verwendet eine Stanzschablone.
I have a tutorial for this Artist Trading Block (ATB) for you on the Viva Las VegaStamps! Blog. I cut the base of the ATB with the Silhouette Cameo. Of course you don't need an e-cutter. You'll find free templates for a cube online or you can use a cutting die.
Und so geht's:
Here are my instructions:
1. Step:
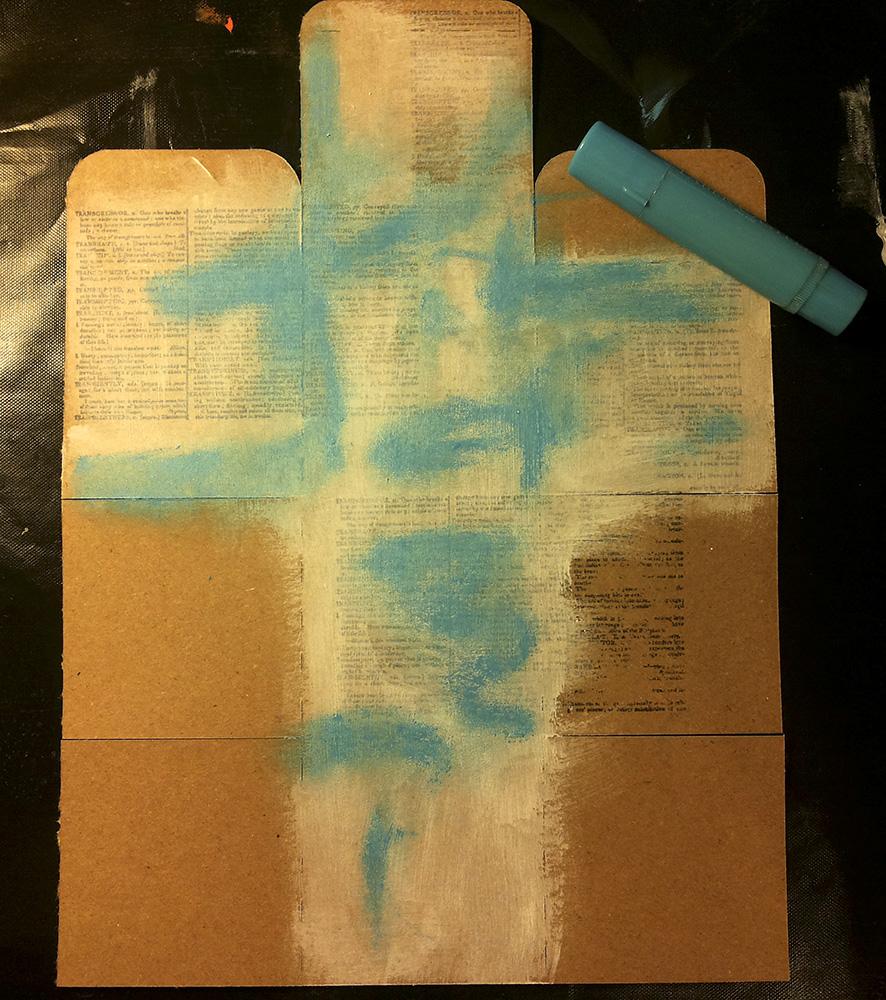
Stempelt den
Dictionary Page Hintergrund auf den Rohling.
Stamp the Dictionary Page background randomly onto the cube blank.
2. Step:
Streicht eine dünne Schicht Gesso darüber.
Add a thin layer of gesso on top.
3. Step:
Mit dem Gelato (Cotton Candy) kommt etwas Farbe ins Spiel. Anstelle der Gelatos könnt Ihr auch andere wasserlösliche Kreiden verwenden. Der Vorteil der Gelatos ist halt, dass diese sich kinderleicht mit den Fingern verwischen lassen.
Use the Gelato (Cotton Candy) to add some color. Instead of the Gelatos you can also use other watercolor crayons. A plus of the Gelatos is, that you can blend them easily with your fingers.
4. Step:
Für etwas mehr Textur wird der
Worn Clockface Stempel verwendet.
Add a second layer of texture with the Worn Clockface stamp.
5. Step:
Für etwas mehr Kontrast eignet sich der weiße Gelato hervorragend.
Take the white Gelato in this step to give the background some more contrast.
6. Step:
Jetzt ist es Zeit für etwas "echte" Struktur. Dafür verwende ich Strukturpaste zusammen mit einer Crackle Schablone.
Now it's time for some structure. I used modeling paste together with a crackle stencil.
7. Step:
Wenn alles getrocknet ist, kann der Würfel zusammen geklebt werden.
When the texture paste is dry you can build up the ATB base.
8. Step:
Der
The Fish in Mini Skirt Stempel und der
Fat Fish in Heels werden gestempelt und ausgeschnitten. Mit den Twinklings H20 kommt ein Schimmereffekt hinzu (ihr könnt jede andere Schimmerfarbe verwenden). An die Fische kommt ein Holzspieß mit Heißkleber dran. Den Spieß habe ich mit Viva Decor Inka Gold eingefärbt. Befor die Fische in den Würfel gesteckt werden, wird die Oberseite noch mit Gel Medium und Glitzer verschönert.
Stamp the The Fish in Mini Skirt and the Fat Fish in Heels and cut them out. Add some Twinklings H2O for a shimmery effect (alternatively you can use other shimmery colors). Adhere a wooden spear to the fishes with hot glue. I colored the spears with Viva Decor Inka Gold. Before you add the fishes to the block, cover the whole top with Gel Medium and glitter.
9. Step:
Glitzer kommt ebenso an alle Kanten. Zum Verzieren verwendete ich Kartonbuchstaben und Zahlen. Koloriert hab ich diese ebenfalls mit Viva Decor Inka Gold. Bestempelt wurden sie mit dem
Be adorable Stempel. Noch ein paar mehr Akzente bringen der
Pylon und
One Way SmallStempel. Für etwas mehr Pepp kommt das silberne Engelshaar hinzu.
Add glitter to the edges as well. I used chipboard die cutted numbers and letters for the embellishing. The chipboard is painted with different colors of Viva Decor Inka Gold and stamped with the Be adorable stamp to add some texture. Some more embellishments are the Pylon and the One Way Small . Use some silver tinsel to finish it up.
Bis bald, Susanne.
See you soon and happy crafting, Susanne.
Stamps from Viva Las VegaStamps!:
Plate 918:
Worn Clockface
Be adorable
Plate 890:
Dictionary Page
Plate 1338:
The Fish in Mini Skirt
Fat Fish in Heels
Plate 927:
Pylon
One Way Small
Other supplies:
Gesso
Gel Medium
Modeling Paste
Gelatos: Cotton Candy, Coconut
Viva Decor Inka Gold: Orange, Violett, Silver, Pink, Blue
StazOn Jet Black
Prima Marketing Crackle Stencil
Memento Luxe: Sweet Plum, Love Letter
Twinklings H2Os: Summer Breze
Glitter
Silver Tinsel
Wooden Spears